Product Categories
Categories are managed from the Products > Product Categories screen. Just like post categories, you can add, delete and edit your categories here, however, unlike post categories you can also upload an image to be associated with the category:

Upload a category image
Category images will be shown on the frontend if you turn on ‘subcategories’ inWooCommerce > Settings > Catalog.
Categories can also be re-ordered by dragging and dropping them – this order will be used by default on the frontend whenever the categories are listed. This includes both widgets and the subcategory view on product pages.
The taxonomy is ‘product_cat’.
Product Tags
Product tags work in exactly the same way as post tags. See http://codex.wordpress.org/Posts_Tags_Screen
The taxonomy is ‘product_tag’.
Product Attributes
Attributes are pieces of data which can add more technical information to a product and help users further refine your catalog while browsing / searching. Creating an attribute set is done in a similar way to a category (we’ll get to that later). For now we’ll describe attributes and their primary benefit with a hypothetical example.
Additionally, attributes are a key component of authoring variable products
Usage scenario
Say you’re opening a video game store, selling all the latest games for all the latest consoles. In this case, your top level product category will most likely be Games inside of which the majority of your catalog will reside.
Now, you could very easily create sub categories for different consoles, genres, etc etc but this information is better suited as attributes. Why? Because a user can select concurrent attributes while refining their search.

Layered navigation for the genre attribute
Example: they’re looking for a sports game for the PS3. This is as simple as navigating to the Games category, then selecting the PS3 and Sport attributes from a sidebar widget. As you’d expect, this will refresh the page so that it only displays sport games for the PS3.
Adding attributes to your store
Setting up attributes themselves uses an interface you will be familiar with. It’s recommended that you set up any attributes you will be using over and over in this way. Navigate to Products > Attributes and you will be presented with the following screen:
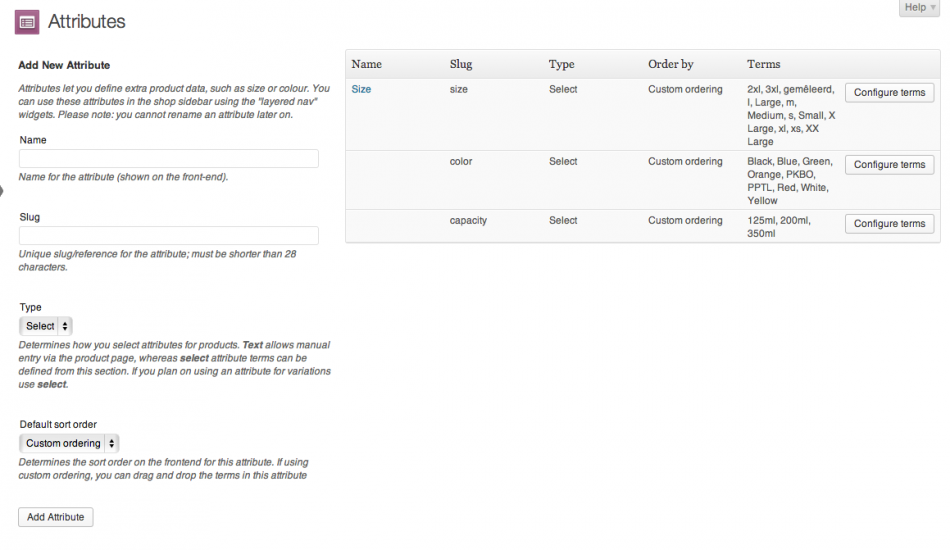
Here you can quickly and easily add attributes and their terms.
You also have the option to create attributes on a per product basis. This is useful should you want to display some extra information about one product which is unlikely to apply to any other. For example you may sell a one-off Japanese game to an English audience. You could make a ‘Language’ attribute for that one product and display in the product data section on the front end.
Using attributes in Layered Navigation
Attributes that you set up for your store can be added to the sidebar via a widget:

Layered Nav
This widget takes an attribute (which you define) and then displays the list of attributes in the shop sidebar allowing the customer to filter the list of displayed products.
– See more at: https://www.jamescarterweb.com/managing-product-categories-tags-and-attributes/#sthash.kwe33Hiz.dpuf